How to Hold and Open Hair Scissors: A Beginner's Guide
By SalonScissors editorial team Updated
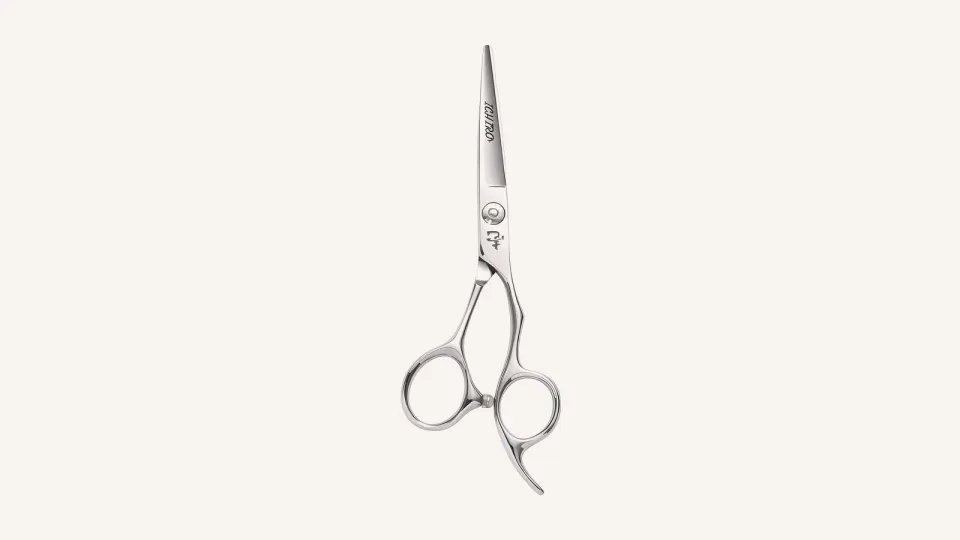
Put your thumb in the thumb ring and your ring finger in the other ring, rest your little finger on the finger rest if the pair has one, and let your first two fingers lie along the shank. Only your thumb moves, and it moves one blade while the other stays steady. Open the blades only as far as the section needs.
How we chose: Grip notes follow standard teaching practice and maker handle guides. Reviewed 4 November 2026. We sell scissors and haven’t run cutting tests.
Which part of the scissor does what?
Before you hold a pair, know the parts. The rings are where your fingers go, the pivot is the joint, and the blades run from the pivot to the tips. Many pairs also have a finger rest, a small projection for your little finger.
- Finger rings
Where your thumb and fingers go. A ring insert makes a loose ring smaller.
- Handles
Join the rings to the pivot. Straight, offset or crane changes your grip.
- Pivot
Where the blades turn. The screw here sets the tension.
- Blades
Everything past the pivot. The edge decides how the scissor cuts.
- Tips
Where point cutting and close detail happen.
- Finger rest
A hook for your little finger. Some screw off, some are fixed.
The thumb ring sits on the moving blade, and the finger ring on the fixed blade. That’s why your thumb does the work and your other fingers keep the pair steady.
How do you hold scissors, step by step?
-
Thumb in the thumb ring
Slide your thumb into the ring on the moving blade, to a depth that lets it move freely without slipping out. Don’t force it through.
-
Ring finger in the other ring
Put your ring finger in the second ring. This finger and the ring hold the fixed blade steady while the thumb does the opening and closing.
-
Little finger on the rest
If your pair has a finger rest, put your little finger on it. It steadies the pair and stops it twisting.
-
First two fingers along the shank
Let your index and middle fingers lie along the shank, close to the pivot. They guide the blade without gripping it.
-
Check the pair isn’t tilting
Hold the scissors up and look at the blades. They should sit square to your hand, not leaning to one side.
If the rings wobble or pinch, the handle may not fit. Our first-use fit check shows how to judge it, and finger inserts can take up slack in a ring that is too big. For how handle layouts change the position of your thumb, see our guide to handles and hand posture.
How do you open and close the blades?
Move the thumb, not the whole hand. Keep your fingers still, open the moving blade to the width the section needs, then close it in one smooth stroke along the blade. Don’t snap the blades shut on the tips, and don’t open them fully if you don’t need to. A smaller opening gives you more control, especially for point cutting and detail near the face.
If hair folds or pushes out as you close, don’t squeeze harder. Check that the blades are clean and the tension is right. Our guide to dragging scissors lists the checks.
How do you handle scissors safely between cuts?
- Close them when you’re not cutting. Open scissors catch on clothing and skin.
- Point the tips down or away when you carry them, and away from the client.
- Pass them handle first to a colleague.
- Rest them in a holster, sleeve or slot, not loose on a trolley.
- Never run a finger along the edge to test it.
- Learn to hold them while you comb. Your teacher will show you how to rest the pair in your hand while you comb or section. Practise it slowly on a mannequin before you try it with a client.
What mistakes do beginners make?
- Gripping too hard. The pair should rest in your fingers, not be squeezed.
- Moving the wrong blade. If you move your whole hand, or push the fixed blade, the cut gets rough. Let the thumb work.
- Forcing the thumb deep into the ring. It limits movement.
- Opening the blades fully for every snip. Open only as much as the section needs.
- Using a pair that doesn’t fit. A mismatch between ring size and finger size is common. Check the handle.
- Using the wrong hand. A left-handed stylist needs a true left-handed pair. See our guide for left-handed stylists.
Does the grip change with the handle?
The basic grip stays the same, but the handle layout changes where your thumb and fingers sit. On a straight handle, the rings sit level. On an offset or crane handle, the thumb ring is nearer the pivot, so your thumb meets it at a different angle. On a swivel handle, the ring turns as your hand moves.
Learn the standard grip first, then adapt it to your pair. If a layout feels awkward after a few sessions, read our guide to handles and hand posture, or ask your teacher to check your grip.
Common questions
Which finger goes in which ring?
On a standard grip your thumb goes in the thumb ring and your ring finger in the other. Your little finger rests on the finger rest if the pair has one, and your first two fingers lie along the shank.
Why does only the thumb move?
The thumb ring is on the moving blade, and the finger ring is on the fixed one. Moving only the thumb keeps the cut steady and the line accurate.
How wide should I open my scissors?
Open them just wide enough for the section. Wider openings give you less control of the tips, so keep the opening smaller for detail work.
My scissors slip in my hand. What should I do?
Check the ring fit. A ring that’s too large can be taken up with finger inserts. See our fit check.
Next step
Practise the grip on a mannequin or a small section before you cut a client, and use our apprentice cutting checklist to keep each session focused. Need a pair? See the scissor finder.
Further reading
For definitions of scissor parts, Scissorpedia is a reference site about hair scissors. Scissorpedia is a fellow member of the ShearAlliance (see ShearAlliance). More topics are in the knowledge base.